
Getting Started with Vue 3 and Vite
A complete guide to configure your first Vue 3 project with Vite, including best practices and modern tools.
In this guide, we will explore how to start a modern project with Vue 3 and Vite, explain the project structure, how a Vue application works, the router, Pinia, composables, and we'll see some best practices for developing scalable and maintainable applications. As a bonus, we'll publish the project to GitHub and see how to install Tailwind CSS v4 to get fast and responsive styles.
Setting up the environment
Before continuing, you should have:
- Node.js, any LTS version. I recommend getting used to using nvm to manage multiple Node versions.
- A package manager (here we'll use
npm, which is already installed with Node.js). - VS Code updated
- Git configured correctly
Also, install the official Vue.js extension for VS Code:
- Vue.js (Volar). Later we'll explore other useful plugins like ESLint, Prettier, and Tailwind CSS IntelliSense.
JavaScript or TypeScript?
Vue 3 has quite good support for TypeScript, you can use it keeping in mind the official usage guide.
You don't need to use TypeScript in all your projects, especially if you're just starting out or just want to experiment. So my recommendation is that you assess your context, the application, and your team (if you're working in one).
In this guide we'll use JavaScript to keep things simple.
Creating the project with Vite
The fastest way to start a Vue 3 project with Vite is using the command (you can run it in any folder where you want to create the project, use VS Code's integrated terminal or your favorite terminal):
npm create vue@latest
If it's the first time you use it, it will ask if you want to install the create-vue package. Answer yes (type y and press ENTER).
 Installing package: create-vue
It will ask you for the project name, type the name you want:
 Give your project a name
Then select the options you need:
 Available features when creating a Vue app
Let's go point by point (as shown in the image, we move with the arrow keys and select with the spacebar):
- TypeScript: as we mentioned before, we'll use JavaScript, so we skip this.
- JSX Support: we won't use JSX.
- Router (SPA development): Vue Router is essential for working with Vue as a SPA (Single Page Application). We won't go into detail about SPA vs MPA, just keep in mind that Vue works as a SPA by default. Select this option.
- Pinia (state management): it's the official library for state management. It will help us manage shared data between components. Select this option.
- Vitest (unit testing): is the recommended testing framework for Vite projects. We won't use it in this guide.
- End-to-End Testing: will allow you to choose and integrate a tool for E2E testing (Playwright, Cypress or Nightwatch). We won't use it in this guide.
- ESLint (error prevention): is a tool to maintain code quality, helping to detect errors and maintain consistent style. I highly recommend its use, although it's important to customize it according to your team and project. We'll select it to explore it a bit more later.
- Prettier (code formatting): is a tool to automatically format code. In this case we'll select it too to explore it.
Press ENTER and now it will ask about some experimental Vite features:
 Vite experimental features
- Oxlint: is a new linter, part of OXC, a new collection of JavaScript tools written in Rust, Oxlint is extremely fast and shows promise, however as mentioned on its website, it still has some issues, so for now I recommend continuing to use ESLint. We ignore this option.
- rolldown vite (experimental): Rolldown-vite is a fork of Vite that uses Rolldown instead of Rollup and esbuild, with the goal of achieving maximum performance. It will soon become the default package, for now let's ignore this option.
We continue pressing ENTER.
It will ask if you want to start with a completely blank project or with examples. If it's your first time, I recommend selecting "No" so you can see a basic structure with examples. That's the option we'll select here.
Vite will create the initial project structure and give us some useful commands, let's run them one by one:
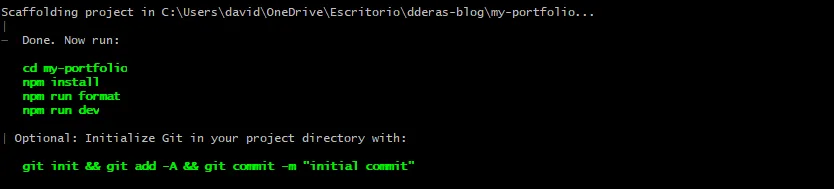 Project created
- First we navigate to the project folder:
cd project-name
- We install the dependencies (this may take a few minutes depending on your connection):
npm install
- This command is to run Prettier, it won't have any effect because we haven't changed anything yet, but it's good to keep it in mind:
npm run format
- Finally, we start the development server:
npm run dev
 Development server running
Vite runs the development server at http://localhost:5173/ (the port may vary if 5173 is already in use (5174, 5175, etc.)).
Port 5173 is a hint to Vite itself:
- 5 = V
- 1 = I
- 7 = T
- 3 = E
Although beyond that, Vite uses port 5173 because it's uncommon in development environments, reducing the likelihood of conflicts with other local servers. Via Why localhost:5173 is Every Frontend Developer's Best Friend.
If we go to that URL in our browser, we'll see the Vue app running:
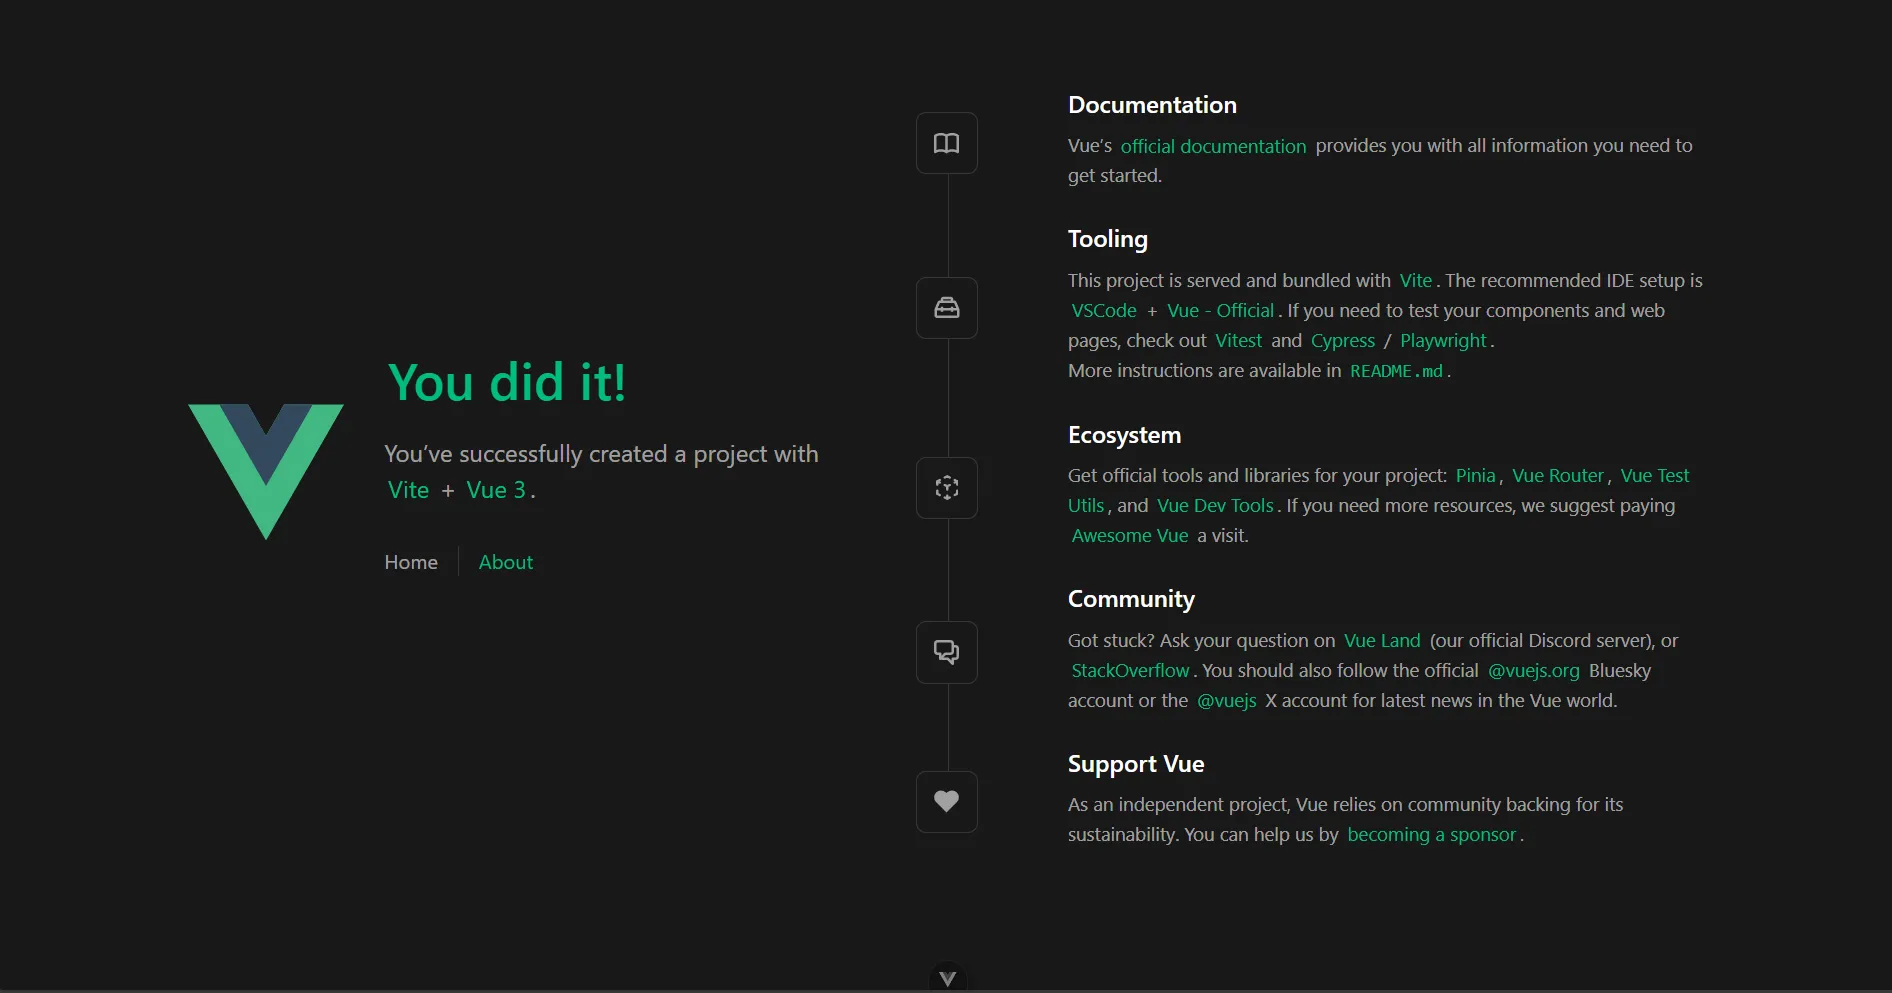 Vue app running
The Vue team shares several official resources to learn more about the framework, starting with the official documentation. Explore each link to learn about the entire ecosystem.
Project Structure
Let's look at the initial structure, open the project in your favorite code editor (I recommend VS Code):
my-vue-app/
├── .vscode/              # (If you're in VS Code) Visual Studio Code configuration
├── node_modules/         # Project dependencies, generated when installing packages
├── public/               # Static files
├── src/                  # Application source code
│   ├── assets/           # Resources like images and styles
│   ├── components/       # Reusable Vue components
│   ├── router/           # Vue Router configuration
│   ├── store/            # Pinia configuration
│   ├── views/            # Views for the routes
│   ├── App.vue           # Root component of the application
│   └── main.js           # Application entry point
├── .editorconfig         # EditorConfig configuration
├── .gitattributes        # Git configuration
├── .gitignore            # Files and folders ignored by Git
├── .prettierrc.json      # Prettier configuration
├── eslint.config.js      # ESLint configuration
├── index.html            # Main HTML file
├── jsconfig.json         # JavaScript configuration for the editor
├── package-lock.json     # Exact versions of dependencies (autogenerated)
├── package.json          # Project information and scripts
├── README.md             # Project documentation
└── vite.config.js        # Vite configuration
The structure may vary slightly depending on the options selected when creating the project (for example, whether or not ESLint or Pinia is included). Also, if you're using VS Code you probably see the .vscode/ folder with specific editor settings and some files you see "grouped":
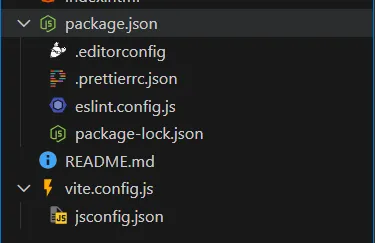 Project structure in VS Code
This is just a visual way that VS Code has to organize files, you can display them individually (my preference) by changing the value of "explorer.fileNesting.enabled" to false in the .vscode\settings.json file.
Understanding the main folders
public/: Here go the static files that will not be processed by Vite. You can place images, fonts or other resources that you need to serve directly.src/: This is the most important folder, it contains all the source code for your application. Here we have:assets/: Here go the resources like images, styles, fonts, etc. that you will use in your application.components/: Here go the global, reusable Vue components that you can use in different parts of your application, for example, buttons, cards, modals, etc.router/: Here is the configuration of Vue Router, where you define the routes of your application and how to navigate between them, as well as possible configuration of guards, lazy loading, etc.store/: Here is the configuration of Pinia, where you define the global state of your application.views/: Here go the main views that correspond to the routes defined in Vue Router. Each view generally represents a full page, unlike components which are smaller, reusable parts. In the end, all are.vuefiles, so the difference lies in their purpose and use.App.vue: This is the root component of your application, where everything is mounted (we will explain more later).main.js: This is the entry point of your application, where Vue is initialized, plugins are configured (like Vue Router and Pinia) and the application is mounted on the DOM.
Is this structure enough?
It's a basic structure that for now is fine. As your application grows, it's normal to want to organize the code better. Here are two proposals:
- Create subfolders by module/functionality within the different folders, like
components/andviews/. For example:
my-vue-app/
├── src/
│   ├── assets/
│   ├── components/
│   │   ├── auth/
│   │   │   ├── LoginForm.vue
│   │   │   └── RegisterForm.vue
│   │   ├── dashboard/
│   │   │   ├── StatsCard.vue
│   │   │   └── ChartWidget.vue
│   │   └── shared/
│   │       ├── BaseButton.vue
│   │       └── BaseModal.vue
│   │
│   ├── views/
│   │   ├── auth/
│   │   │   ├── LoginView.vue
│   │   │   └── RegisterView.vue
│   │   ├── dashboard/
│   │   │   └── DashboardView.vue
│   │   └── home/
│   │       └── HomeView.vue
│   │
│   ├── store/
│   │   ├── auth/
│   │   │   └── auth.store.js
│   │   ├── dashboard/
│   │   │   └── dashboard.store.js
│   │   └── shared/
│   │       └── ui.store.js
│   │
│   ├── router/
│   │   ├── auth.routes.js
│   │   ├── dashboard.routes.js
│   │   └── index.js
│   │
│   ├── ...
├── ...
You can use an approach similar to this in small or medium apps, with few people working, where you want a bit more order without overcomplicating things and without changing too much the original structure proposed by Vue. The limitation is that as the app grows, it can become difficult to manage dependencies between modules and keep the code organized, because everything is scattered across multiple folders.
- In other cases, you can opt for a structure based on features or modules, where each one has its own folder that contains components, views, and related logic. For example:
my-vue-app/
├── src/
│   ├── modules/
│   │   ├── auth/                     # If the module is small, you can omit the division into folders
│   │   │   ├── components/
│   │   │   │   └── LoginForm.vue
│   │   │   ├── views/
│   │   │   │   └── LoginView.vue
│   │   │   ├── store/
│   │   │   │   └── auth.store.js
│   │   │   ├── router/
│   │   │   │   └── auth.routes.js
│   │   │   └── index.js
│   │   │
│   │   ├── dashboard/
│   │   │   ├── components/
│   │   │   ├── views/
│   │   │   ├── store/
│   │   │   ├── router/
│   │   │   └── index.js
│   │   │
│   │   └── users/
│   │       ├── components/
│   │       ├── views/
│   │       ├── store/
│   │       ├── router/
│   │       └── index.js
│   │
│   ├── shared/
│   │   ├── components/
│   │   │   ├── BaseButton.vue
│   │   │   └── BaseModal.vue
│   │   ├── composables/
│   │   │   └── useFetch.js
│   │   ├── store/
│   │   │   └── ui.store.js
│   │   ├── utils/
│   │   │   └── formatDate.js
│   │   └── constants/
│   │       └── roles.js
│   │
│   ├── router/
│   │   └── index.js                # Main router file that imports routes from modules
│   │                               # (guards go here)
│   ├── ...
├── ...
Each module or feature concentrates everything it needs in one place, which simplifies navigation and facilitates code maintenance. This approach is especially beneficial in large or complex applications.
The shared/ folder is useful for storing components, composables, utilities, and constants that are reusable throughout the application (just be careful not to overload it).
The basis of this approach is to divide the application into independent modules within /src/modules, each with its own internal structure.
Ultimately, the choice depends on the size and complexity of your project, as well as the preferences of your team, so there's no single correct way to do it. These are just examples to inspire you.
Understanding how the Vue app is mounted
The entry point of the Vue application itself is the src/main.js file, this is where it's initialized, plugins are configured and it's mounted on the DOM. If we look at the src/main.js file:
import './assets/main.css';

import { createApp } from 'vue';
import { createPinia } from 'pinia';

import App from './App.vue';
import router from './router';

const app = createApp(App);

app.use(createPinia());
app.use(router);

app.mount('#app');
Here's what we're doing:
- We import the global styles from
main.css. This file contains any styles you want to apply globally. - We import the
createAppandcreatePiniafunctions to create new instances of Vue and Pinia. - We import the root component
App.vue. - We import the route configuration from
src/router/index.js. - We create the application instance with
createApp(App), passing the root componentAppas an argument, indicating that this will be the starting point of our Vue application, basically we're telling Vue: "Here's the main component, you'll build the entire application from it". - We use
app.use(createPinia())to register the Pinia instance, enabling global state management in our application. - We use
app.use(router)to register the Vue Router instance and enable navigation between views. - Finally, we mount the Vue application on the DOM element with the id
appusingapp.mount('#app').
Now, open the index.html file located at the root of the project:
<!DOCTYPE html>
<html lang="">
  <head>
    <meta charset="UTF-8" />
    <link rel="icon" href="/favicon.ico" />
    <meta name="viewport" content="width=device-width, initial-scale=1.0" />
    <title>Vite App</title>
  </head>
  <body>
    <div id="app"></div>
    <script type="module" src="/src/main.js"></script>
  </body>
</html>
Here we see that the HTML file has a <div> with the id app, which is where Vue will mount our application. The <script> that follows loads our main.js file, which is where we initialize everything.
Open the src/App.vue file:
<script setup>
import { RouterLink, RouterView } from 'vue-router';
import HelloWorld from './components/HelloWorld.vue';
</script>

<script setup>
import { RouterLink, RouterView } from 'vue-router';
import HelloWorld from './components/HelloWorld.vue';
</script>

<template>
  <header>
    <img alt="Vue logo" class="logo" src="@/assets/logo.svg" width="125" height="125" />

    <div class="wrapper">
      <HelloWorld msg="You did it!" />

      <nav>
        <RouterLink to="/">Home</RouterLink>
        <RouterLink to="/about">About</RouterLink>
      </nav>
    </div>
  </header>

  <RouterView />
</template>

<style scoped>
/* Estilos CSS */
</style>
Here we see that App.vue contains a header with a logo, a HelloWorld component, and a navigation menu with links to the routes defined. The <RouterView /> is where the corresponding views will be rendered based on the current route, thanks to Vue Router.
Let's explore the router configuration. Open the src/router/index.js file:
import { createRouter, createWebHistory } from 'vue-router';
import HomeView from '../views/HomeView.vue';

const router = createRouter({
  history: createWebHistory(import.meta.env.BASE_URL),
  routes: [
    {
      path: '/',
      name: 'home',
      component: HomeView,
    },
    {
      path: '/about',
      name: 'about',
      /* This route uses lazy loading */
      component: () => import('../views/AboutView.vue'),
    },
  ],
});

export default router;
Here we're importing the necessary functions from Vue Router and defining a basic route for the HomeView view and another for AboutView. The / route renders HomeView, and the /about route loads AboutView using lazy loading (lazy loading).
Let's review the complete flow:
- The
index.htmlfile is what the browser shows us, and the first thing it does is loadmain.js. - In
main.js, the Vue application is created withApp.vueas the root component (apart from importing styles, configuring Pinia, Vue Router and other configurations). App.vuedefines the main structure of the application (like a main layout) and uses<RouterView />to render views based on the current route.
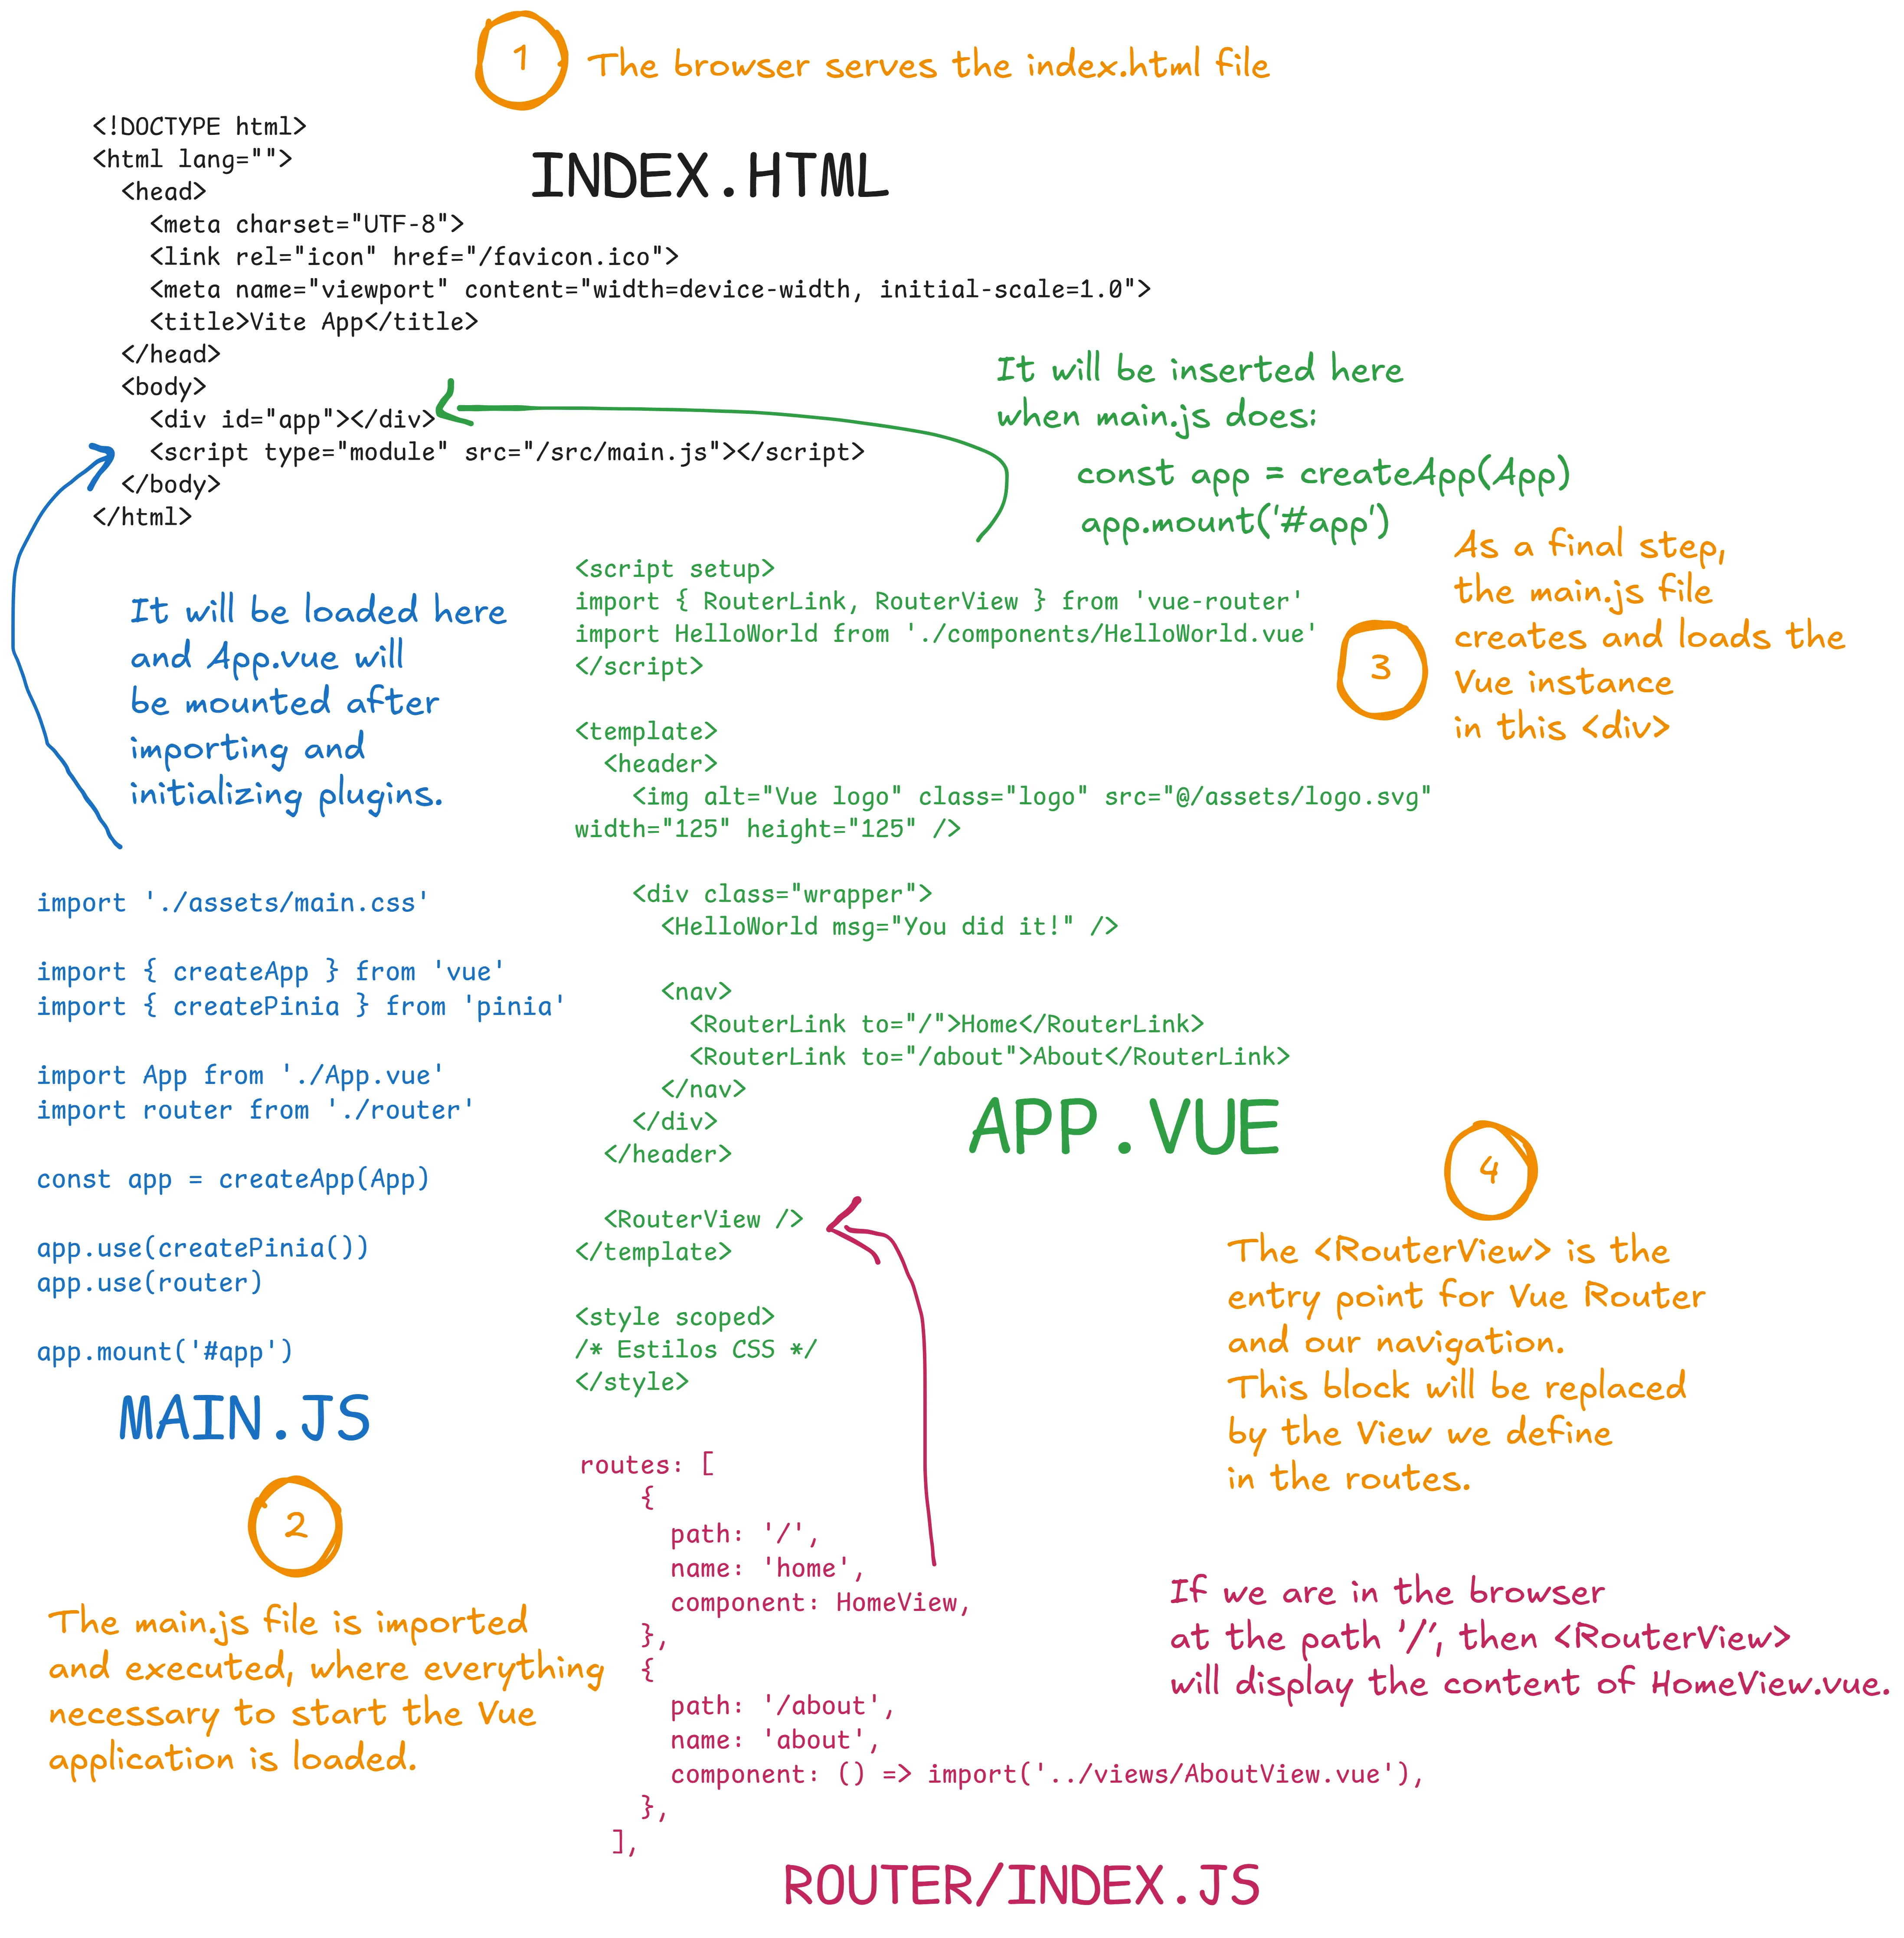 Flow of a Vue app
This means that everything you see inside App.vue will always be present (like the header and navigation menu), while the main content will be displayed inside <RouterView /> and will change depending on the current route, thanks to our router.
Normally, in more complex applications, App.vue will also contain other common elements like a footer, sidebars, global modals, etc.
And when needed, specific layouts are created for different application modules, for example, a layout for admin views and another for public views like login. You can explore more at this Vue School resource.
At this point we already have a clear idea of how a Vue 3 application with Vite is structured and mounted. You can start to explore and modify the components, views and routes to become more familiar with the framework. Now we'll continue exploring other important concepts and tools in the ecosystem.
Pinia for global state management
Pinia helps us manage the global state of our application: data that should be accessible from any part of the application, data that we need to share between multiple components or views.
For example, when we need access to authenticated user information in different parts of the app, or if we want to manage a shopping cart that can be consulted from different components.
Let's see a basic example. Create the file src/store/auth.store.js:
import { defineStore } from 'pinia';

export const useAuthStore = defineStore('auth', {
  state: () => ({
    user: null,
    token: null,
  }),

  actions: {
    login(userData, token) {
      this.user = userData;
      this.token = token;
    },

    logout() {
      this.user = null;
      this.token = null;
    },
  },
});
Here we're defining a store called auth that has a state with the properties user and token, and two actions to log in and log out.
Now, let's see how to use this store in a component. Create a Vue component, for example src/components/Auth.vue:
<template>
  <div>
    <div v-if="authStore.user">
      <p>Welcome, {{ authStore.user.name }}!</p>
      <button @click="logout">Logout</button>
    </div>
    <div v-else>
      <button @click="login">Login</button>
    </div>
  </div>
</template>
<script setup>
import { useAuthStore } from '../store/auth.store';
const authStore = useAuthStore();
const login = () => {
  // Simulate a login
  const userData = { name: 'John Doe', email: 'john.doe@example.com' };
  const token = 'fake-jwt-token';
  authStore.login(userData, token);
};

const logout = () => {
  authStore.logout();
};
</script>
Here we're importing the useAuthStore store and using it to access the user state and the login and logout actions.
Thanks to Pinia, the user state is kept consistent everywhere, and any change (like logging in or out) is automatically reflected in all components that use this store.
Some real-world use cases:
- User Authentication: You create a store to manage the state of the authenticated user, with data like the token, name, roles, etc. You can create actions to log in, log out, and update user information.
- Shopping Cart: You create a store to manage the products in the cart, with actions to add, remove, and update products. This state can be accessed from any part of the application, like the products page and the cart page.
- User Preferences: You create a store to manage user preferences, like theme (light/dark), language, etc. You can create actions to update these preferences and reflect them throughout the application.
You can explore more about Pinia in the official documentation.
Composables
Composables are reusable functions that encapsulate specific logic, with state, and can be used across different components.
They allow us to organize our code better, promoting reuse and separation of concerns. Normally all logic with state we would put inside a <script setup> in a Vue component, but if that logic is something that could be useful in multiple components, we can extract it to a composable.
Let's see a fairly basic example. Create a file called src/composables/useClipboard.js:
import { ref } from 'vue';

export function useClipboard() {
  const copied = ref(false);

  const copyToClipboard = async (text) => {
    try {
      await navigator.clipboard.writeText(text);
      copied.value = true;
      setTimeout(() => {
        copied.value = false;
      }, 2000);
    } catch (error) {
      console.error('Failed to copy:', error);
    }
  };

  return {
    copied,
    copyToClipboard,
  };
}
Here we're defining a composable called useClipboard that provides a function to copy text to the clipboard and a reactive state copied that indicates whether the text was copied successfully.
When implementing it we could have something like this. Create a component called src/components/ClipboardExample.vue:
<template>
  <div>
    <input v-model="textToCopy" placeholder="Type something to copy" />
    <button @click="copyToClipboard(textToCopy)">Copy to Clipboard</button>
    <p v-if="copied">Text copied!</p>
  </div>
</template>
<script setup>
import { ref } from 'vue';
import { useClipboard } from '../composables/useClipboard';
const { copied, copyToClipboard } = useClipboard();
const textToCopy = ref('');
</script>
And then import this component in App.vue and add it below the HelloWorld component to test it:
<script setup>
import { RouterLink, RouterView } from 'vue-router';
import HelloWorld from './components/HelloWorld.vue';
import ClipboardExample from './components/ClipboardExample.vue';
</script>

<template>
  <header>
    <img alt="Vue logo" class="logo" src="@/assets/logo.svg" width="125" height="125" />

    <div class="wrapper">
      <HelloWorld msg="You did it!" />
      <ClipboardExample />
      <!-- Aquí -->
      <nav>
        <RouterLink to="/">Home</RouterLink>
        <RouterLink to="/about">About</RouterLink>
      </nav>
    </div>
  </header>

  <RouterView />
</template>
The copied state allows us to show a message when the text has been copied successfully.
What do we achieve with this?
- Reusability: We can use
useClipboardin any component that needs clipboard copy functionality, without duplicating code. - Organization: The logic related to the clipboard is encapsulated in a single place.
- Maintenance: If we need to change how we copy to the clipboard, we only have to modify the composable, not all the components that use it.
What's the difference between a composable and a Pinia store?
Global state vs local state: Pinia stores are designed to manage global application state, data that must be accessible and shared from anywhere.
Composables, on the other hand, handle logic and state that can be reused in multiple components, but none of that is shared. For example, if I have multiple components that need clipboard copy functionality (and need some state control), I would use a composable, and the copied state would be local in each instance of the composable. On the other hand, if I need to know in multiple places if a copy to the clipboard has been performed at the application level, I would use a Pinia store, because here all components would be aware and could react to that change.
Let's put it as an example: thanks to the copied variable, I can display something within the same component, such as the message "Text copied". Now, if I wanted, for example, my application's layout to display an icon in the navigation bar every time something is copied to the clipboard, then it would be better to use a Pinia store to manage that state globally, so that when copying from my ClipboardExample.vue component, the layout would also notice the change and could display the icon.
What's the difference between a composable and a utility file (utils)?
Utility functions are generally simpler and don't have state, they take inputs (some) and return outputs without side effects. For example, if we didn't need the copied state and only wanted a function to copy text, we could create a simple utility function instead of a composable:
export function copyToClipboard(text) {
  return navigator.clipboard.writeText(text);
}
Recommended readings:
- Composables - Vue.js Documentation
- Good Practices and Design Patterns for Vue Composables
- What should be a Plugin vs a Composable vs a Store in Nuxt
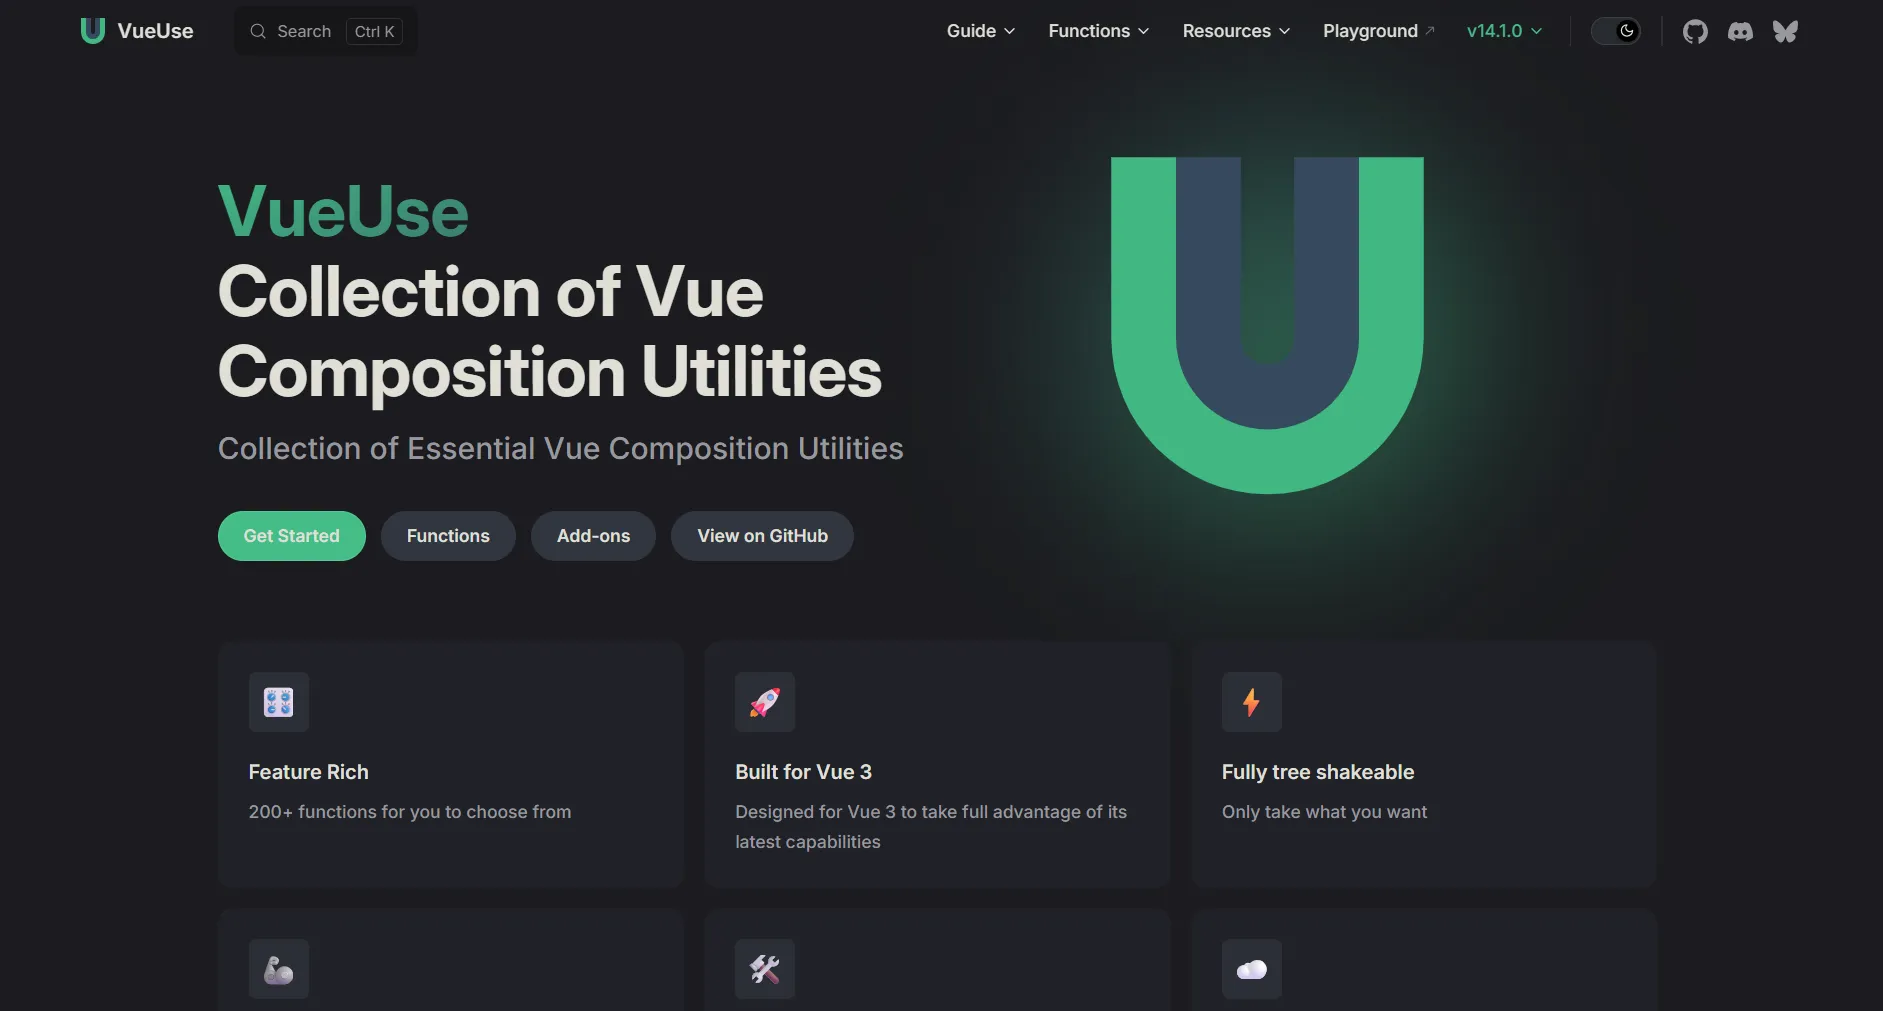
VueUse
VueUse is a collection of composables for Vue 3. It provides a wide range of ready-to-use features, from state management to DOM interactions and browser APIs. You can explore the official documentation to see all available composables and how to use them in your projects.
 VueUse
Some popular examples of composables in VueUse include:
useBreakpoints: to be able to manage breakpoints in your application and help with responsive design.useFetch: to make HTTP requests easily.useLocalStorage: to sync data with the browser's local storage.useDark: to handle dark and light themes in the application.useClipboard: to copy text to the clipboard (similar to the one we created before).
It's a very useful collection that can save you time if you need any of these features. Just be careful not to overload your project with unnecessary dependencies, install only what you're really going to use and only if you really need a library for it.
ESLint and Prettier
Get used to using ESLint, it's too useful for maintaining code quality and avoiding common errors. The configuration generated by Vite is a good starting point, but I always recommend personalizing it.
You can explore the available rules in the official documentation of ESLint and eslint-plugin-vue.
All rules can be configured as "off", "warn" or "error", depending on the severity you want to assign:
"no-console": "warn", // Shows a warning if console.log is used
"eqeqeq": "error", // Forces the use of === and !== instead of == and !=
"vue/multi-word-component-names": "off", // Disables the rule that forces multi-word component names
In the project we created, you can use the npm run lint command to review all your code according to the configuration in the eslint.config.js file.
About Prettier, there's some debate about its use, many people don't like it because it can impose a style you don't like, so try it, explore it, and use it only if you're comfortable with it. Instead of Prettier, to try to always maintain consistent style, you can use alternatives like EditorConfig, ESLint's own rules, or your code editor's configuration.
If you use some of these tools you can explore their extensions:
EXTRA: Installing Tailwind CSS v4
Pure CSS is more than fine, you can achieve incredible results (sometimes even without needing JavaScript), but an option you have to speed up your development and maintain consistent style is Tailwind CSS.
Following the official steps in the Tailwind CSS documentation, let's install Tailwind CSS v4 in our Vue project with Vite.
First (being inside the project folder), install Tailwind CSS and its Vite plugin:
npm install tailwindcss @tailwindcss/vite
Then, we add the plugin to our vite.config.js file:
import { fileURLToPath, URL } from 'node:url';

import { defineConfig } from 'vite';
import vue from '@vitejs/plugin-vue';
import vueDevTools from 'vite-plugin-vue-devtools';
import tailwindcss from '@tailwindcss/vite'; // Import the plugin

// https://vite.dev/config/
export default defineConfig({
  plugins: [
    vue(),
    vueDevTools(),
    tailwindcss(), // Add to Vite configuration
  ],
  resolve: {
    alias: {
      '@': fileURLToPath(new URL('./src', import.meta.url)),
    },
  },
});
Then in the src/assets/main.css file, replace all content with the following:
@import './base.css';

@import 'tailwindcss';
We take the opportunity to clean up the src/assets/base.css file and leave only what's necessary:
*,
*::before,
*::after {
  box-sizing: border-box;
  margin: 0;
  font-weight: normal;
}

body {
  min-height: 100vh;
  color: var(--color-text);
  background: var(--color-background);
  transition:
    color 0.5s,
    background-color 0.5s;
  line-height: 1.6;
  font-family: Inter, system-ui, Avenir, Helvetica, Arial, sans-serif;
  font-size: 15px;
  text-rendering: optimizeLegibility;
  -webkit-font-smoothing: antialiased;
  -moz-osx-font-smoothing: grayscale;
}
Now let's test that everything works correctly. First, stop the development server if it's running (Ctrl + C in the terminal) and then start it again:
npm run dev
Open the src/App.vue file and replace all content with the following:
<script setup>
import { RouterLink, RouterView } from 'vue-router';
</script>
<template>
<div class="flex h-screen flex-col bg-gray-50">
<!-- App Bar -->
<header class="flex h-16 items-center justify-between bg-white px-6 shadow-sm">
<div class="text-xl font-bold text-gray-800">My Project</div>
<nav class="flex gap-4" aria-label="Main Navigation">
<a href="#" class="text-gray-600 hover:text-gray-900">Home</a>
<a href="#" class="text-gray-600 hover:text-gray-900">Profile</a>
</nav>
</header>
<div class="flex flex-1 overflow-hidden">
<!-- Sidebar -->
<aside class="w-64 overflow-y-auto bg-white border-r border-gray-200">
<nav class="p-4 space-y-2" aria-label="Sidebar Navigation">
<RouterLink
to="/"
class="block rounded-md px-4 py-2 text-gray-700 hover:bg-gray-100"
exact-active-class="text-indigo-700 font-bold"
>
Home
</RouterLink>
<RouterLink
to="/about"
class="block rounded-md px-4 py-2 text-gray-700 hover:bg-gray-100"
exact-active-class="text-indigo-700 font-bold"
>
About
</RouterLink>
</nav>
</aside>
<!-- Main Content -->
<main class="flex-1 overflow-y-auto p-6">
<RouterView />
</main>
</div>
<!-- Footer -->
<footer
class="flex h-12 items-center justify-center bg-white border-t border-gray-200 text-sm text-gray-500"
>
© 2025 My Project. All rights reserved.
</footer>
</div>
</template>
With this, we have created a basic structure with an app bar, a sidebar, a main content area, and a footer, all styled with Tailwind CSS classes.
Ideally, each block (AppBar, Sidebar, Footer) should be a separate component to promote reuse and maintenance, but for this example, we leave everything in App.vue for simplicity.
Verify that everything works correctly by opening http://localhost:5173 in your browser. You should see the basic structure with styles applied.
With that, you now have Tailwind CSS v4 working in your project. Explore its official documentation and install its extension for better autocompletion in VS Code: Tailwind CSS IntelliSense.
EXTRA: Uploading the project to GitHub
For this, we have many options. Before starting, I assume you already have a GitHub account and Git installed on your machine.
- First, initialize a Git repository in the project folder (if you haven't already):
git init
- Then create a
.gitignorefile in the root of the project (you probably already have one) and make sure it contains the following lines to ignore unnecessary files and folders:
# Logs
logs
*.log
npm-debug.log*
yarn-debug.log*
yarn-error.log*
pnpm-debug.log*
lerna-debug.log*

node_modules
.DS_Store
dist
dist-ssr
coverage
*.local

# Editor directories and files
.vscode/*
!.vscode/extensions.json
.idea
*.suo
*.ntvs*
*.njsproj
*.sln
*.sw?

*.tsbuildinfo

.eslintcache

# Cypress
/cypress/videos/
/cypress/screenshots/

# Vitest
__screenshots__/
- Now let's add all files and make the initial commit:
git add .
git commit -m "Initial commit"
- Now, go to GitHub and create a new repository. You can do this by clicking the "+" icon in the top right corner and selecting "New repository". Give it a name (for example,
my-vue-app), add a description if you want, and choose whether it will be public or private. Do not initialize it with a README, .gitignore, or license, since we already have those locally. - Then, follow the instructions GitHub gives you to connect your local repository with the remote one. They are usually something like this:
git remote add origin https://example-url.git
git branch -M main
git push -u origin main
- We check status
git status
It should say that we are on the main branch, we are synchronized with the remote repository origin/main, and there is nothing to commit.
- Finally, whenever we make changes and want to push them to GitHub, we do:
git add .
git commit -m "Description of the changes"
git push
And that's it! You now have your Vue 3 project with Vite uploaded to GitHub.
It's common to always use a version control system like Git to manage your code, even in personal projects. It will help you keep a history of changes, collaborate with others, and protect your work.
I also recommend exploring Conventional Commits to maintain consistent and meaningful commit messages. It's something many companies, teams, and open source projects use.
Some resources to learn more about Git and GitHub:
VS Code Extensions:
EXTRA: Other Useful Extensions for VS Code
Some extensions that I always recommend for VS Code (regardless of the type of project):
- Error Lens: Highlights errors and warnings directly in the code, making them easier to identify and fix.
- Color Highlight: Highlights colors defined in your CSS code, making them easier to visualize.
- Better Comments: Improves the readability of comments in the code through colors and styles.
- Iconify Intellisense: If you want to work with icons, this extension allows you to search and insert icons from multiple libraries directly into your code. Additionally, I recommend exploring its library Iconify where you can find a wide variety of free icon sets.
Well, that's it for this introductory guide to Vue 3 with Vite. I hope you found it useful for starting your journey with this framework and its ecosystem.